QR Code Digital Menu for Restaurants: Free Setup Guide (2026)
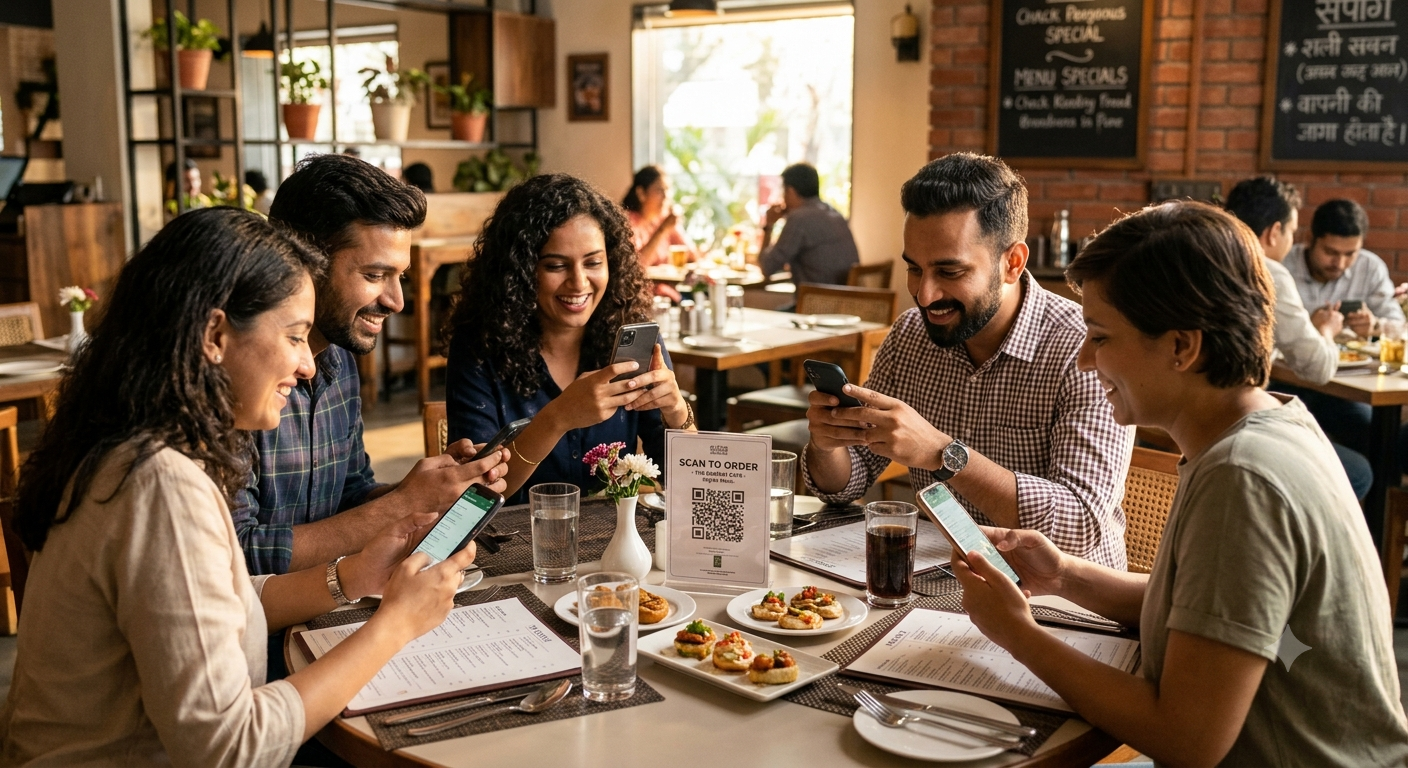
Walk into any modern restaurant in Bangalore, Mumbai, or Delhi today, and chances are you will see a small card on the table with a QR code. No printed menu. No waiting for a waiter to bring the card. Just scan, browse, and order. What started as a hygiene measure during COVID has become the new standard - and restaurants that have not adopted QR code menus are falling behind.
Most guides on this topic stop at "how to make a menu people can view on their phone." That is only half the job. A menu customers can only look at still needs a waiter to walk over, listen, and manually enter the order - you have digitized the menu but not the bottleneck. This guide shows the full version: a QR code that lets a customer actually order from their table, with the request landing directly in your kitchen workflow the moment your staff accepts it. Every step below is a real screen from ShyBiz, not a generic tool.
Why Digital Menus (and Table Ordering) Are No Longer Optional
The shift to digital menus in India is not a trend - it is a permanent change. Here is why:
Customer Expectations Have Changed
Post-COVID, customers are accustomed to scanning QR codes. In fact, many now prefer it. A 2025 survey by the National Restaurant Association of India found that 67% of urban diners prefer digital menus over physical ones. They are faster, cleaner, and always up to date.
Physical Menus Are Expensive
A decent printed menu costs ₹150-300 per piece. For a 30-table restaurant, that is ₹4,500-9,000 - and you need to reprint every time prices change, a dish is added or removed, or the menu gets stained. Over a year, most restaurants spend ₹15,000-40,000 on menu printing alone. A QR code menu costs nothing to update.
Instant Updates
Ran out of paneer today? With a physical menu, customers order it and then get disappointed when the waiter says it is unavailable. With a digital menu, you mark it as "out of stock" in seconds - no awkward conversations, no wasted time.
Multilingual Reach
India is multilingual. A single physical menu in English might alienate customers who read Hindi, Tamil, or Bengali more comfortably. Digital menus can offer multiple language options without printing separate copies.
Fewer Waiters Needed at Peak Hours
A viewable-only menu still needs a waiter to take the order down. A menu that lets customers submit the order themselves removes that step entirely - your staff shift from "taking orders" to "serving and accepting," which is where a QR table-ordering setup earns its keep over a plain digital menu.
View-Only Menu vs. Full QR Table Ordering - What Is the Difference?
Most "free" QR menu tools (a Google Site, a Canva PDF on Google Drive, a WhatsApp catalog) give you a link customers can look at. That is genuinely useful and costs nothing, but the order itself still has to reach the kitchen by a waiter walking over and writing it down, or typing it into the POS after hearing it verbally.
ShyBiz''s table QR goes one step further: the customer orders directly from the same page they are browsing, and that request lands on your staff screen for a one-tap Accept - at which point it becomes a real Kitchen Order Ticket (KOT), merged into that table''s bill automatically. Nothing is typed twice. Since it is built into the POS you already bill on, there is no separate menu tool, no separate login, and no separate system to keep in sync.
How to Set Up QR Table Ordering in ShyBiz (Step by Step)
Step 1: Get Your Menu Into ShyBiz
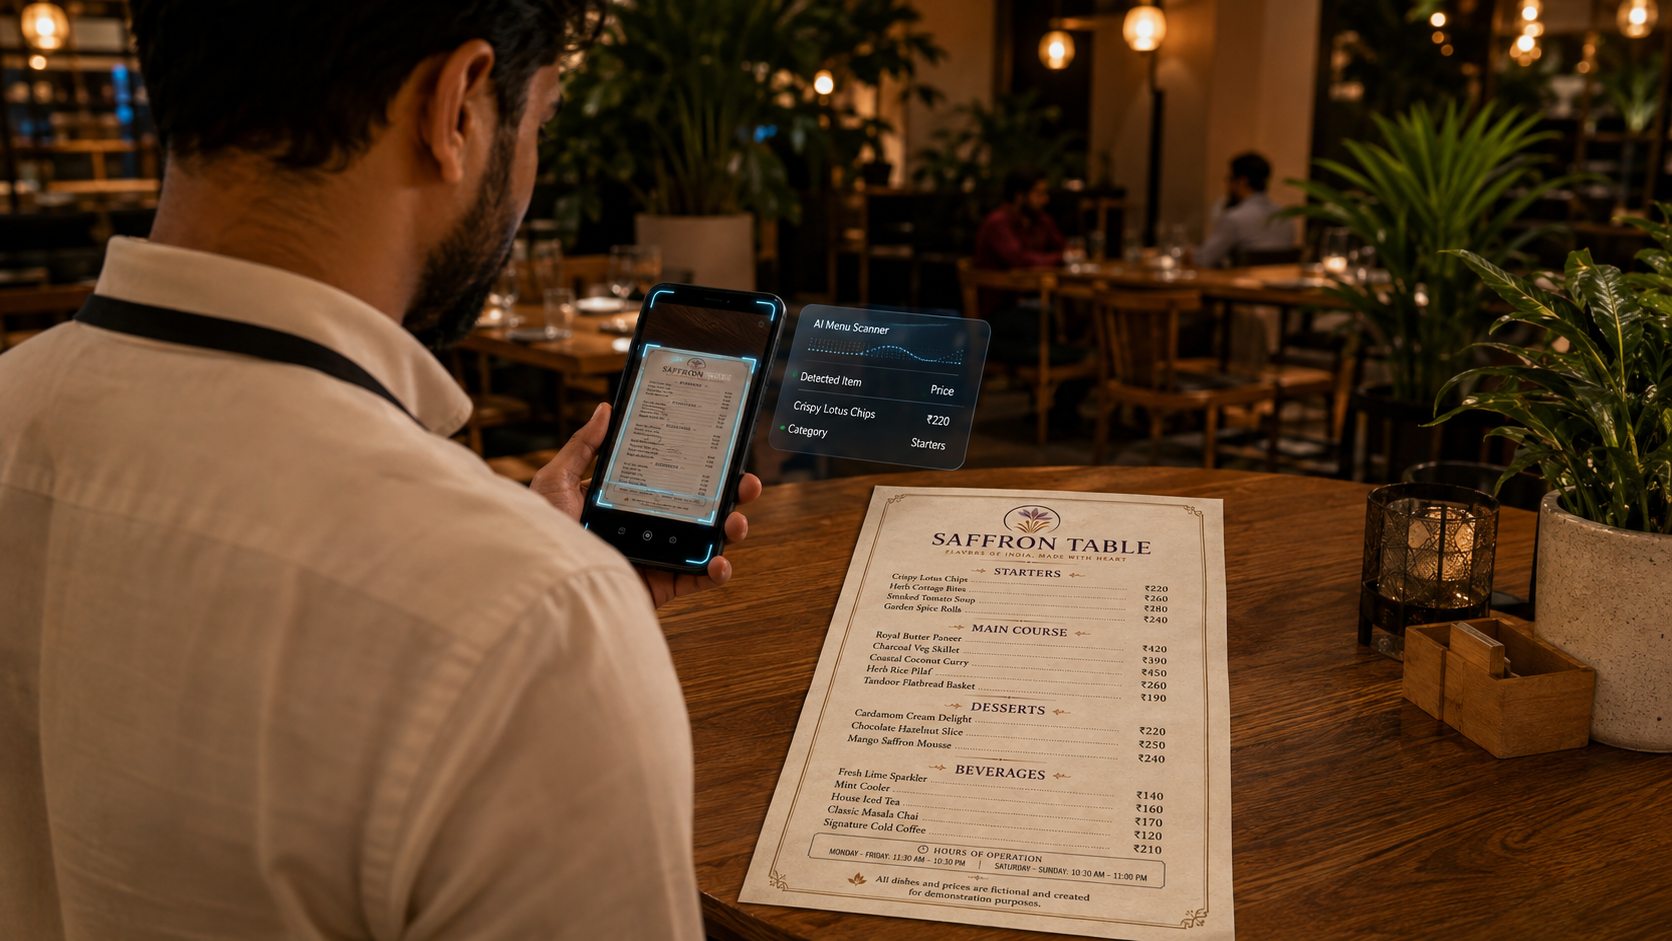
Table ordering only works once your items exist in the system. If your menu is still on paper, do not type it in by hand - our AI Menu Scanner guide shows how to turn a photo of your menu card into ready-to-edit items in about two minutes.
Step 2: Set Up Your Tables
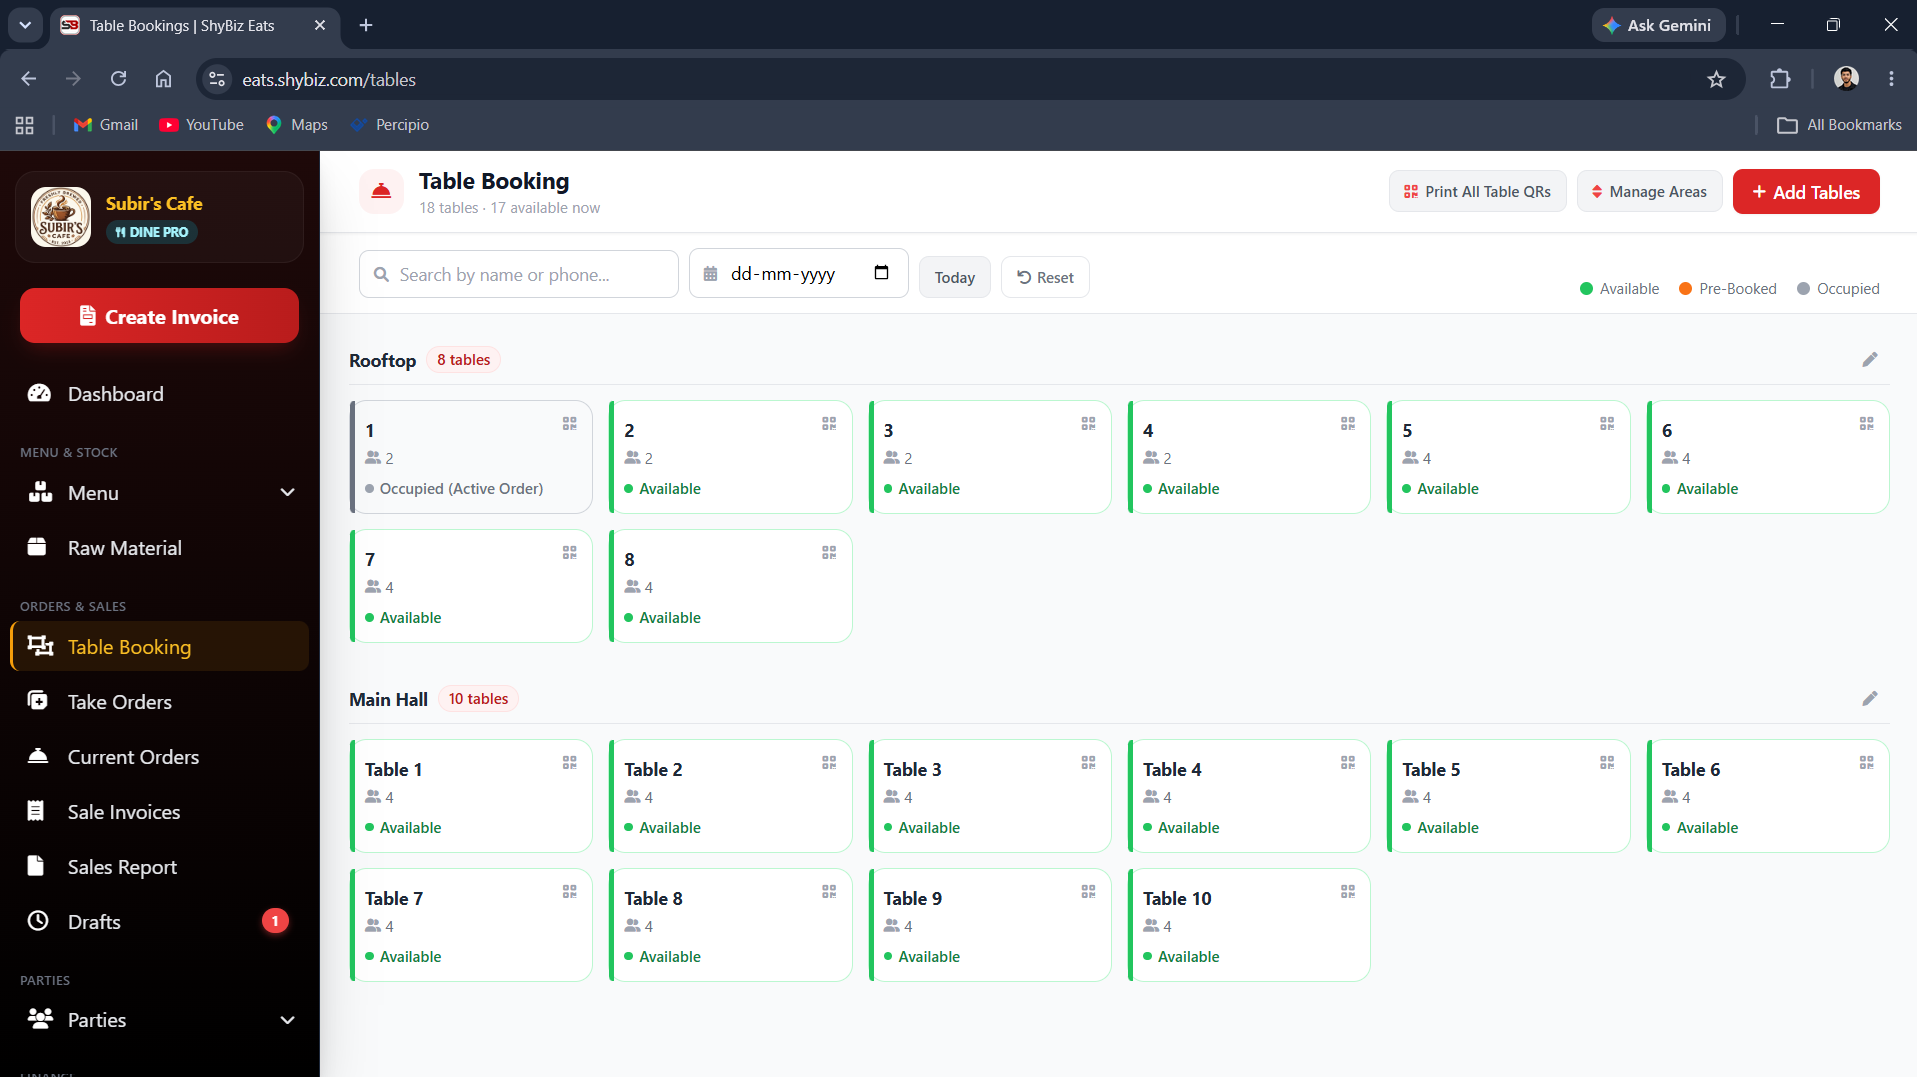
Open Manage Tables and add your dining areas and tables the way they are actually laid out - "Ground Floor," "Terrace," "AC Section," whatever matches your restaurant. Each table gets its own QR code, so this structure is what customers will see as "Ordering for Terrace · Table 4."
Step 3: Generate and Download Each Table''s QR Code
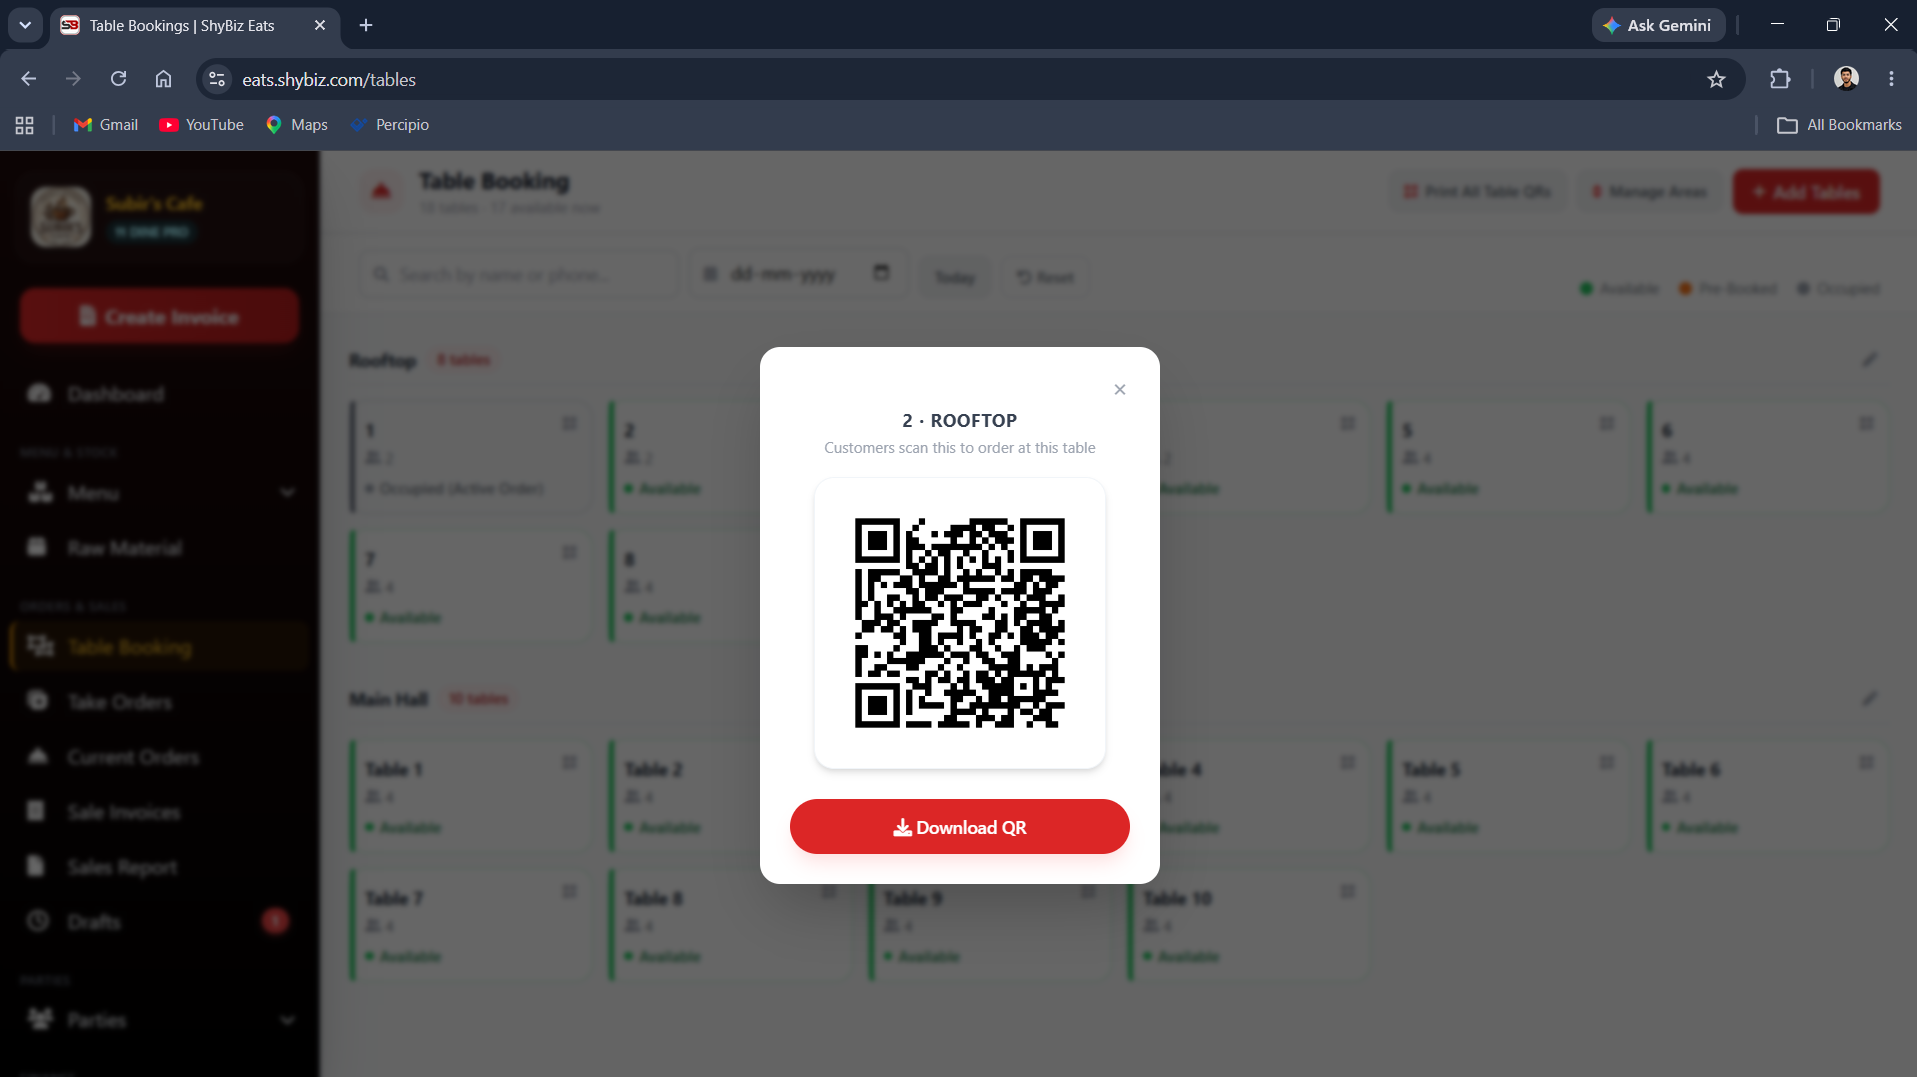
Tap the QR icon on any table card to open its QR code - unique to that table - with a one-tap Download QR. If you have a lot of tables, skip the one-by-one downloads and use Print All Table QRs at the top of the page for a single ready-to-print PDF covering every table at once.
Step 4: Print and Place the QR Codes
Your QR code needs to look professional, not like a printout taped to the table:
- Print on thick card stock (250-300 GSM) and laminate for durability
- Standard size: 10cm x 15cm tent card, printed at least 5cm x 5cm for the QR itself - smaller codes struggle to scan in low light
- Include your restaurant logo and a short instruction like "Scan to view menu & order"
- Place one per table, positioned where a seated customer sees it immediately
- Cost: ₹5-10 per card when printed in bulk at a local printer
Step 5: What the Customer Sees When They Scan
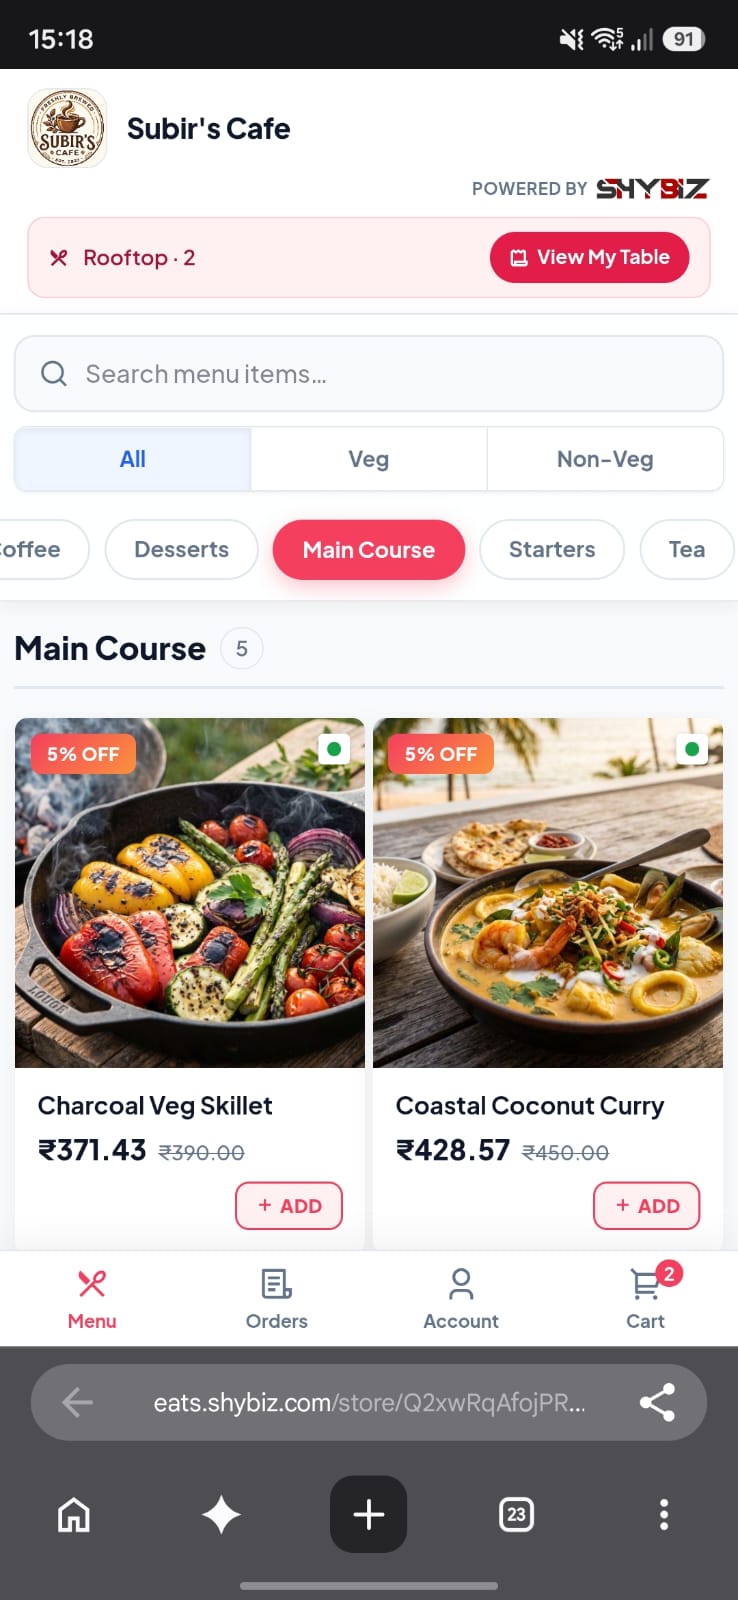
Scanning opens your live menu locked to that exact table - no app to install, no account to create. The page shows "Ordering for {area name} · {table name}" at the top so there is never any confusion about where the order is going, then the customer browses categories, adds items to a cart, and submits.
Step 6: Accept the Order on the Staff Side
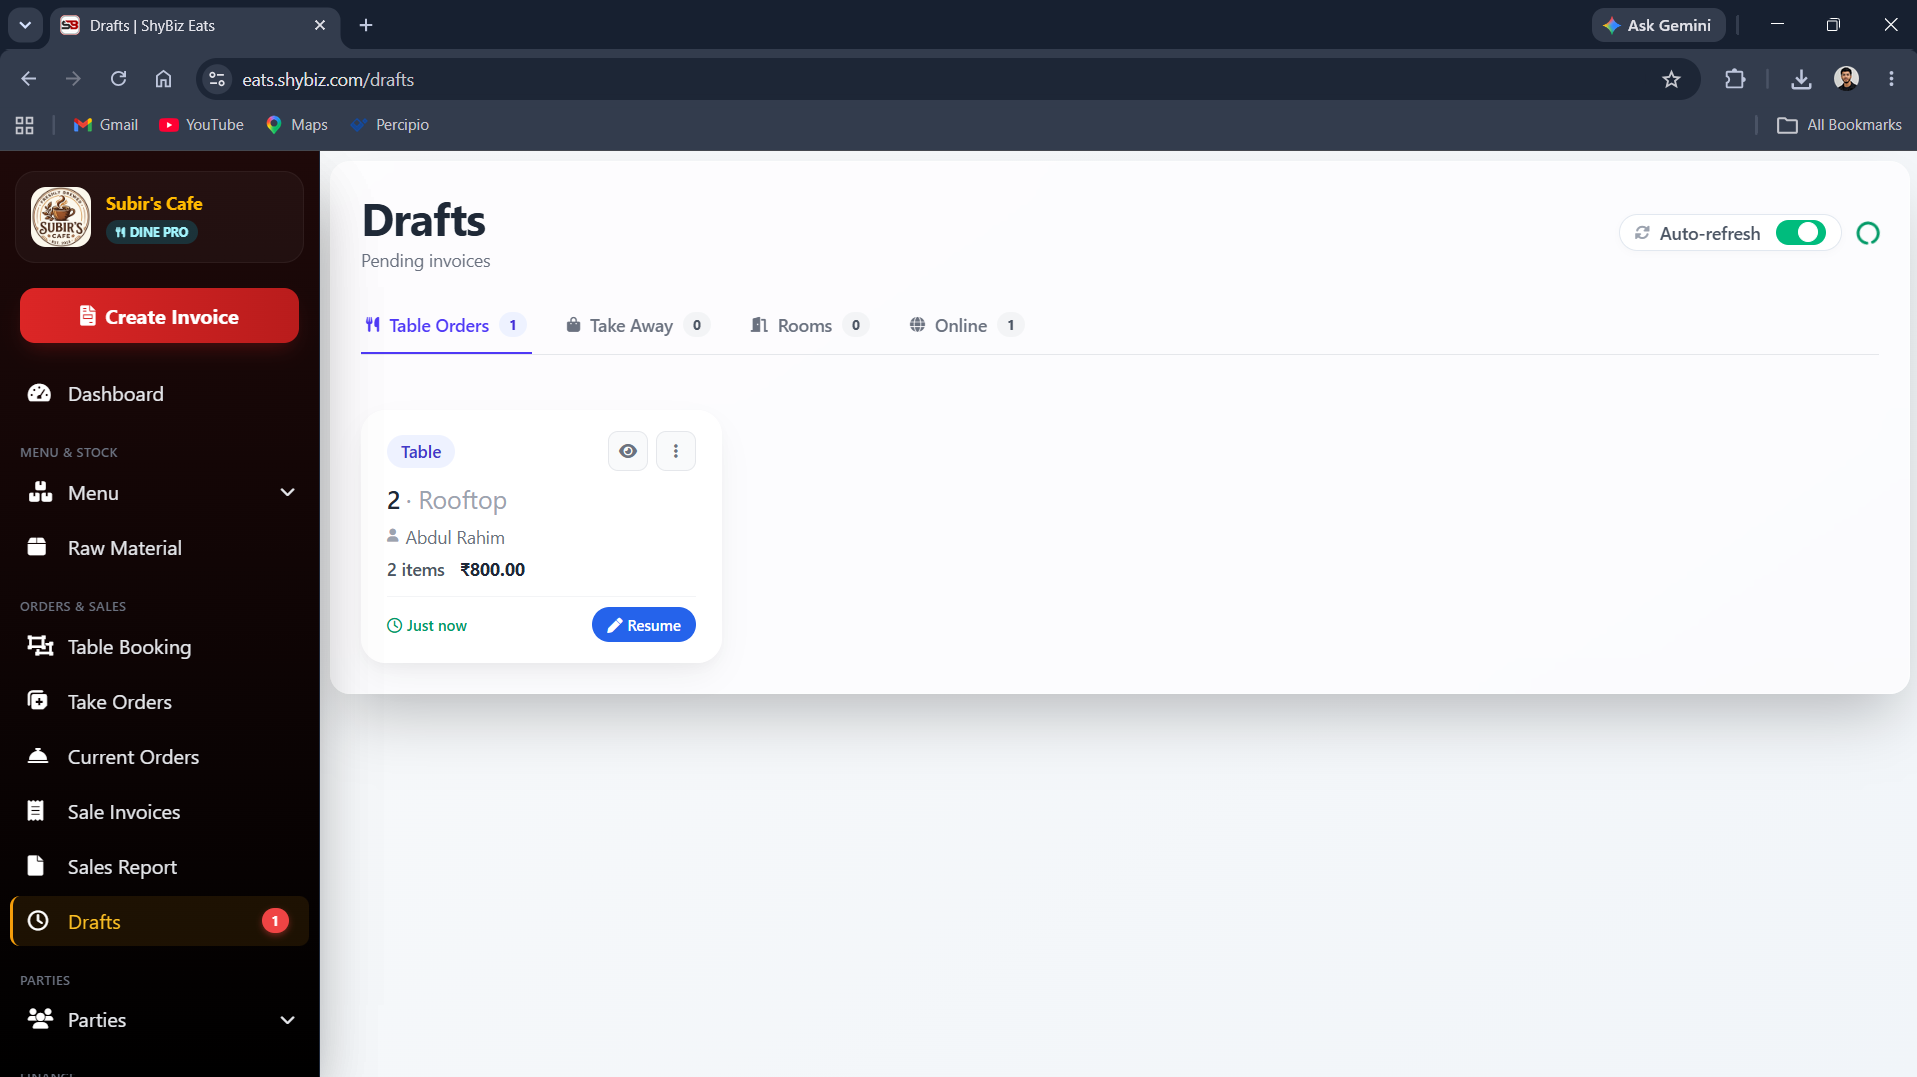
The request does not go straight to the kitchen - a QR link has no login behind it, so anyone with the link could technically submit something, and an unmoderated instant-KOT is a real prank-order risk. Instead it lands as a pending request in the Table Orders tab, clearly marked, with Accept and Reject on every card.
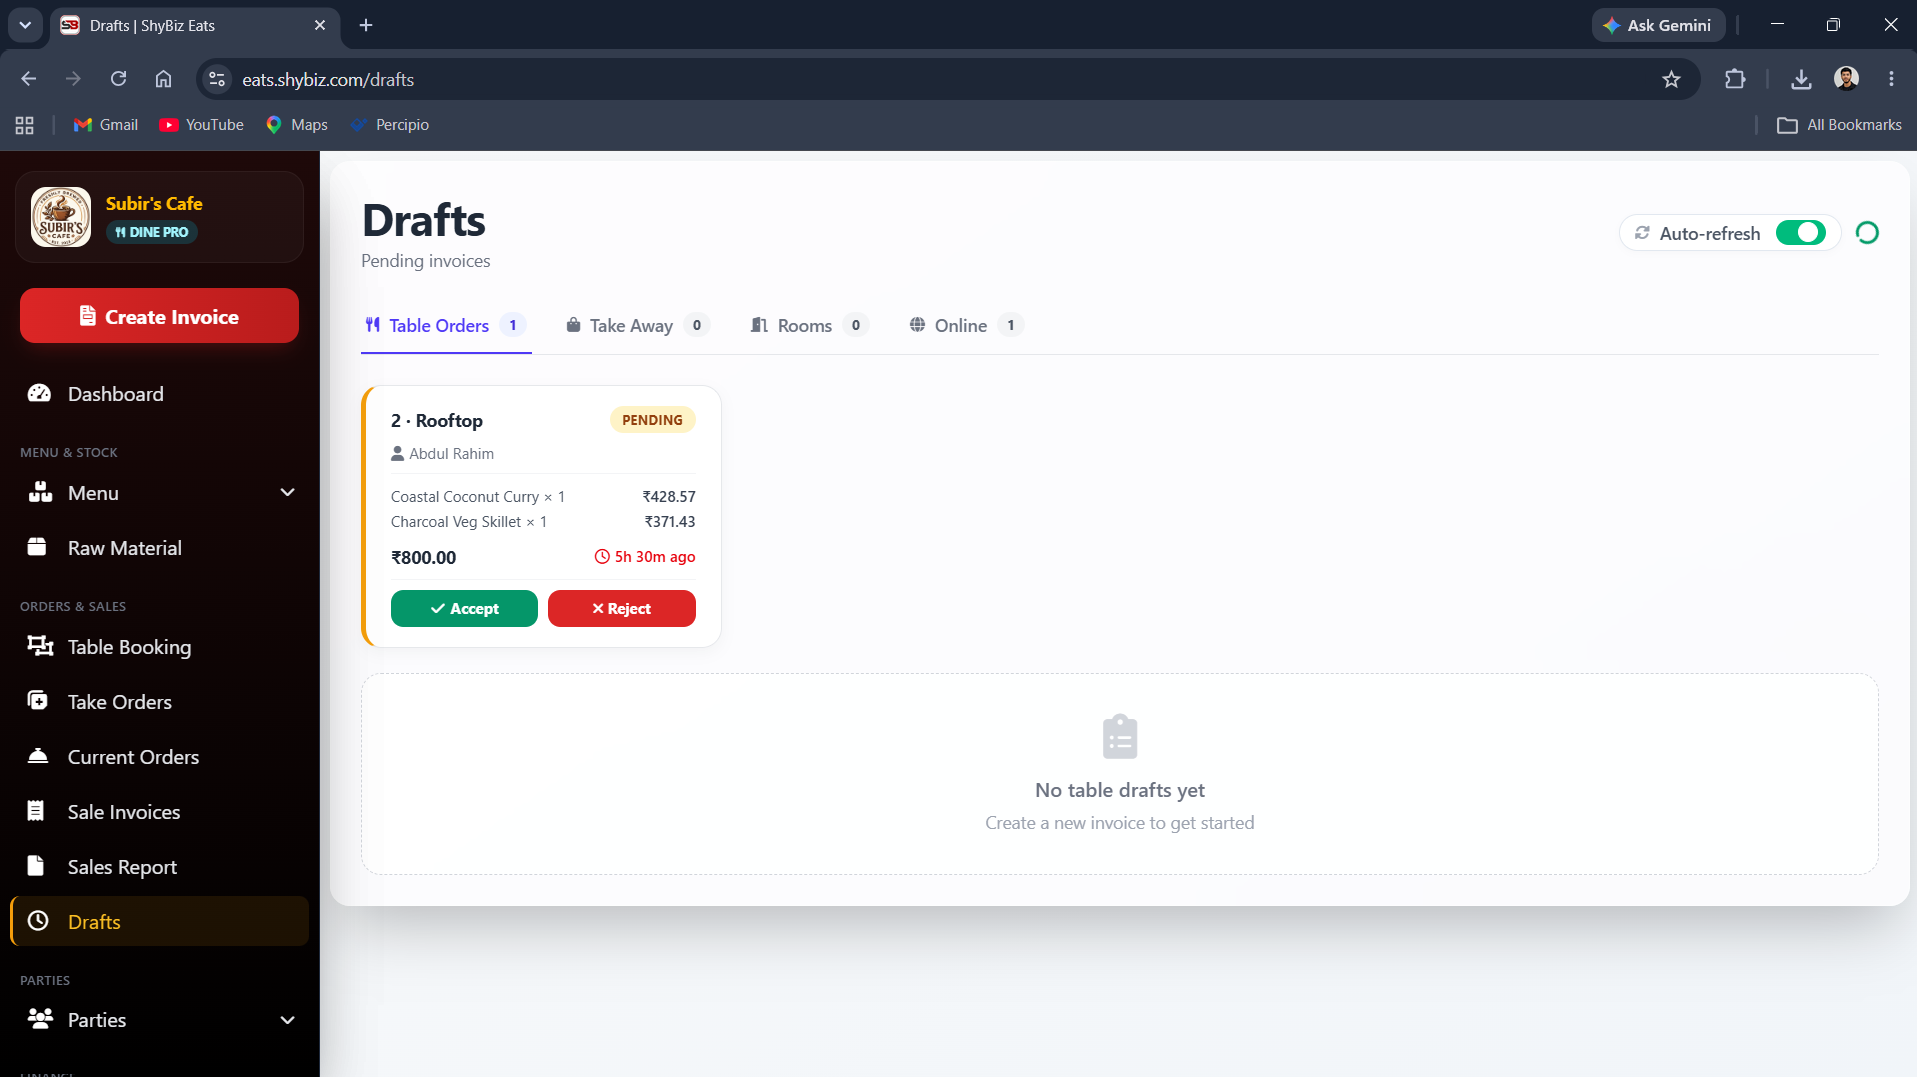
Tap Accept and it becomes a real order in seconds: the KOT prints for the kitchen, and it merges into that table''s open ticket exactly like an order a waiter typed in manually - if the table already has other items on it, this just adds to the same bill.
Step 7: Bill the Table Normally
Because the accepted order is a normal ticket, billing needs no extra step - close it out the same way you would any dine-in table. Your sales reports, inventory deductions, and tax calculations all stay unified, since nothing about this order lived in a separate system at any point.
Benefits of QR Code Table Ordering: The Full Picture
Cost Savings
- Zero reprinting costs when prices change
- No need to buy new menus when they get worn, stained, or outdated
- Fewer staff hours spent walking orders from table to kitchen counter
Speed and Efficiency
- Customers can browse and order immediately - no waiting for a waiter to be free
- Orders reach the kitchen the moment staff accept, cutting table turnaround time
- Peak-hour chaos is reduced when customers order directly from their phones instead of flagging down staff
Instant Menu Changes
- Add a new dish and it is live on every table''s QR immediately
- Running a festive special? Update the menu once and every table sees it
- Mark an item out of stock and it disappears from the customer view instantly
Better Customer Experience
- Photos help customers visualize dishes before ordering, reducing "that is not what I expected" moments
- Veg/Non-Veg markers let customers filter quickly - essential for Indian diners
- No shared physical menus changing hands - still a consideration for health-conscious customers
Mistakes to Avoid
1. Tiny QR Codes
If the printed QR code is smaller than 3cm x 3cm, many phone cameras will struggle to scan it, especially in low light. Print at least 5cm x 5cm.
2. No Fallback for Non-Smartphone Users
Not every customer carries a smartphone, especially in smaller towns. Keep a few physical menus available so a digital-only approach does not alienate anyone.
3. Ignoring the Pending-Order Queue
The whole point of the Accept step is that a real person reviews the request before it hits the kitchen - if nobody is watching the Table Orders tab during a rush, orders sit unaccepted and customers wait longer than if they had just flagged a waiter. Assign someone to keep an eye on it during service.
4. Poor WiFi / Mobile Connectivity
If your restaurant has weak phone signal indoors, offer a complimentary WiFi network customers can connect to so the menu still loads reliably.
5. Not Updating the Menu
The biggest advantage of a digital menu is instant updates - but only if you actually make them. An outdated digital menu is worse than a printed one, because customers expect digital to be current.
Getting Started Today
You do not need a week to implement this. Here is what you can realistically do this afternoon:
- Scan your menu with the AI Menu Scanner if it is not already in ShyBiz (a few minutes per page)
- Set up your dining areas and tables in Manage Tables (10-15 minutes)
- Download and print QR codes for every table, or use Print All Table QRs for one PDF (5 minutes)
- Place QR cards on tables and test-scan a few yourself (5 minutes)
- Run one table QR-only for a shift, watch how staff handle the Accept queue, then roll out to every table
Start small. One table, one shift, one day of watching how it fits your service flow. Once staff are comfortable tapping Accept and customers are scanning without hesitation, roll it out to every table. The shift to QR ordering is happening across Indian restaurants right now - the only question is whether yours leads or follows.